Monday 14 May 2018

Run OpenCDS (Docker)

1.- Clone docker project:


2.- The docker project has the following structure:

.
├── Dockerfile
├── files
│   ├── img_scripts
│   │   └── run.sh
│   ├── maven
│   │   └── settings.xml
│   ├── opencds
│   │   ├── knowledgeModules.xml
│   │   ├── opencds.properties
│   │   └── sec.xml
│   └── tomcat
│       ├── manager.xml
│       ├── setenv.sh
│       └── tomcat-users.xml
└── readme.txt


We need to add the opencds WAR file and a sample knowledge repository inside of the opencds folder.  These files can be downloaded from https://opencds.atlassian.net/wiki/spaces/OP/pages/18382934/Releases


Rename the files as shown below.  Note that we have change the zip extension of the sample knowledge module to jar extension

opencds
├── knowledgeModules.xml
├── opencds-decision-support-service.war
├── opencds-knowledge-repository-data.jar
├── opencds.properties
└── sec.xml


3.- Build docker image running the following command:

docker build -t="opencds/opencds" .


4.- Run container

docker run -it -p 38080:8080 --name opencds opencds/opencds /bin/bash

Inside of the container change directory to the tomcat/bin folder:

cd /usr/local/tomcat/bin

Run the tomcat instance:

./catalina run

The wsdl should be available in localhost:38080/opencds-decision-support-service?wsdl 

5.- Test the service with SoapUI.  You can download a sample project from here 

Open the request demo on soapui:


Make sure that the target url is localhost:38080

Note that the payload is encoded as base64.  You can decode the payload using this online tool 

Click on the green arrow to send the request.  The response is also decoded in base64:


Tuesday 3 March 2015

Running opencds service on Docker (Boot2Docker)

Running opencds service on Docker (Boot2Docker)


TODO list

1- Download Boot2Docker from:
http://docs.docker.com/installation/windows/
Install

2.- Go to opencds docker repository and select opencds-opencds:
https://registry.hub.docker.com/repos/opencds/

3.- Click on Souce Project page

4.- Copy the git url

5.- Start Boot2Docker

6.- clone the repository using the git url, for example:
git clone https://bitbucket.org/opencds/opencds-docker.git

7.- Download the following files from opencds releases, to your C:\Users folder
link https://opencds.atlassian.net/wiki/display/OP/Releases
remove the version from the name of each file, you mush have the following:

- opencds-decision-support-service.war
- opencds-knowledge-repository-data.jar (rename the extention from zip to jar)

You must place these two files inside of opencds-docker folder
cp /c/Users/DockerShare/*.* opencds-docker/

8.- Build image and run container
go to opecde-docker folder:
cd opencds-docker/

build image:
sudo docker build -t="opencds/opencds:ubuntu" .

run container:
sudo docker run -d -p 8080:8080 --name opencds opencds/opencds:ubuntu

9.- Opencds service WSDL will be available on the following path:
localhost:8080/opencds-decision-support-service?wsdl


Friday 6 February 2015

MySQL Workbench - Data export

- In MySQL Workbench click on Data Export and set the export options according to the following screen shot:


- Click Start Export

References

Evernote helps you remember everything and get organized effortlessly. Download Evernote.

Thursday 5 February 2015

Migrate MS SQL Apelon content to MySQL

Download Microsoft® SQL Server® 2008 R2 Service Pack 1
http://www.microsoft.com/en-gb/download 

Run installer
open terminal

sqlcmd -S \SQLExpress

restore filelistonly from disk='C:\Program Files\Microsoft SQL Server\MSSQL10_50.SQLEXPRESS\MSSQL\Backup\dts_20150112_ 20000.bak';
GO

- Note: In order to avoid the following error:
Msg 3201, Level 16, State 2, Server WIN-1VMUV8AJRHG\SQLEXPRESS, Line 1
Cannot open backup device 'C:\Users\Administrator\Downloads\dts_20150112_ 20000.
bak'. Operating system error 5(Access is denied.).
Msg 3013, Level 16, State 1, Server WIN-1VMUV8AJRHG\SQLEXPRESS, Line 1
RESTORE FILELIST is terminating abnormally.

- you must allow read/write permissions to SQL Server on the folder where you have placed the .bak file or you can use the Backup folder of the sql server (e.g., C:\Program Files\Microsoft SQL Server\MSSQL10_50.SQLEXPRESS\MSSQL\Backup\) 

- the terminal will show the content of the backup.  Yow need the first fields that tell you the logical names :


Teminal:

Microsoft Windows [Version 6.1.7600]
Copyright (c) 2009 Microsoft Corporation.  All rights reserved.

C:\Users\Administrator>sqlcmd -S \SQLExpress
1> restore filelistonly from disk='C:\Program Files\Microsoft SQL Server\MSSQL10_50.SQLEXPRESS\MSSQL\Backup\dts_20150112_ 20000.bak';
2> GO
LogicalName
                                                 PhysicalName


                                                                      Type FileG
roupName
                                            Size                 MaxSize
      FileId               CreateLSN                   DropLSN
   UniqueId                             ReadOnlyLSN                 ReadWriteLSN
                BackupSizeInBytes    SourceBlockSize FileGroupId LogGroupGUID
                      DifferentialBaseLSN         DifferentialBaseGUID
       IsReadOnly IsPresent TDEThumbprint
--------------------------------------------------------------------------------
------------------------------------------------ -------------------------------
--------------------------------------------------------------------------------
--------------------------------------------------------------------------------
--------------------------------------------------------------------- ---- -----
--------------------------------------------------------------------------------
------------------------------------------- -------------------- ---------------
----- -------------------- --------------------------- -------------------------
-- ------------------------------------ --------------------------- ------------
--------------- -------------------- --------------- ----------- ---------------
--------------------- --------------------------- ------------------------------
------ ---------- --------- ------------------------------------------
dts
                                                 c:\Program Files\Microsoft SQL
Server\MSSQL10_50.SQLEXPRESS\MSSQL\DATA\dts.mdf


                                                                      D    PRIMA
RY
                                                         9437184       351843720
80640                    1                           0
0 0F1FD1EB-8A12-4679-A531-F8FB9D3DBB66                           0
              0              9437184             512           1 NULL
                               217000000005800037 EA55F188-39C9-46F4-889B-AC8AD2
763D23          0         1 NULL
dts_log
                                                 c:\Program Files\Microsoft SQL
Server\MSSQL10_50.SQLEXPRESS\MSSQL\DATA\dts_1.ldf


                                                                      L    NULL

                                                         1048576        21990232
55552                    2                           0
0 61A7EBA2-5D83-41DC-9A0E-5C8BDBFBA107                           0
              0                    0             512           0 NULL
                                                0 00000000-0000-0000-0000-000000
000000          0         1 NULL

(2 rows affected)
1>


Restore database

RESTORE DATABASE dts FROM disk='C:\Program Files\Microsoft SQL Server\MSSQL10_50.SQLEXPRESS\MSSQL\Backup\dts_20150112_ 20000.bak'
WITH 
   MOVE 'dts' TO 'c:\Program Files\Microsoft SQL Server\MSSQL10_50.SQLEXPRESS\MSSQL\DATA\dts.mdf', 
   MOVE 'dts_log' TO 'c:\Program Files\Microsoft SQL Server\MSSQL10_50.SQLEXPRESS\MSSQL\DATA\dts_1.ldf';
GO


Teminal:

1> RESTORE DATABASE dts FROM disk='C:\Program Files\Microsoft SQL Server\MSSQL10
_50.SQLEXPRESS\MSSQL\Backup\dts_20150112_ 20000.bak'
2> WITH
3>    MOVE 'dts' TO 'c:\Program Files\Microsoft SQL Server\MSSQL10_50.SQLEXPRESS
\MSSQL\DATA\dts.mdf',
4>    MOVE 'dts_log' TO 'c:\Program Files\Microsoft SQL Server\MSSQL10_50.SQLEXP
RESS\MSSQL\DATA\dts_1.ldf';
5> GO
Processed 1152 pages for database 'dst', file 'dts' on file 1.
Processed 1 pages for database 'dst', file 'dts_log' on file 1.
RESTORE DATABASE successfully processed 1153 pages in 0.372 seconds (24.214 MB/s
ec).
1>


MySQL Workbench migration

- Check if you have an OBDC driver for SQL server


Open the migration wizard on MySQL Workbench and select on Stored Connection (Local Instance M


- leave the use and password empty
- test connection

define the connection details of your local mysql server


- Click on Store in ... and set the password of your mysql database
- Test connection 


- Select schematas to migrate


- Click next
- Select all objects
- Modify the following sql script

- and set COLLATE utf8_bin :


- Click apply


References

Evernote helps you remember everything and get organized effortlessly. Download Evernote.

Tuesday 3 February 2015

Docker notes

What is docker?
- "an open platform for developers and sysadmins to build, ship, and run distributed applications" https://www.docker.com/whatisdocker/
- analogous to shipping containers where the goods are loaded in standard containers and ship to different locations
- It leverages LXC (Linux Containers). 
- It uses Linux Kernel facilities such as cGroups, namaspaces and SElinux to provide isolation between containers

Advantages
- portable deployments
     - containers are portable
     - applications can be bundled into single units
     - applications can be deployed on different linux environments without making changes
- fast application delivery
     - easy for developers and admins to collaborate and deploy applications on production
     - standard container format (developers only worry about the applications)
     - admin only worry about deploying containers into the servers
     - building a containers takes seconds
     - containers can be deployed on cloud environments, physical servers, virtual machines, etc
- use of less resources
     - containers do not use a full operational system
     - resources are lesser as compared to virtual machines     

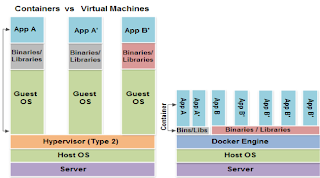
Difference between VM and containers


Docker components
- Images
     - e.g., ubuntu or centos and with some applications already installed.  It is a read-only template
- Registries 
     - repository for Docker images (e.g., Docker hub)
- Containers 
     - execution environment for applications
     - applications and services are packaged into containers
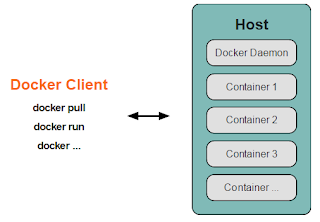
- Docker client and server

Supported platforms
- Mac and Windows requires special wrappers such as boot2Docker and vagrant can be used for Docker deployments
- Debian
- RHEL
- SUSE
- Microsoft Azure
- Gentoo
- Amazon EC2
- Google Cloud Platform
- Arch Linux
- Rackspace
- IBM Softlayer
- Digital ocean
- FrugalWare
- CRUX Linux
- Ubuntu

Docker architecture
- Docker daemon 
     - Runs on the host machine
- Docker client
     - user interface with docker

References

Evernote helps you remember everything and get organized effortlessly. Download Evernote.

Saturday 31 January 2015

UMLS on Windows

List of steps required to install UMLS in a Windows machine:

Go to UMLS web site:

Click on Downloads

Click on the UMLS link:

Create a folder in your local machine e.g., C:\UMLS
Download all files (see image below), e.g., 2014AB.CHK, 2014... You will need to register an account


After download the files your directory should look like this:


Run mmsys

run.bat or run64.bat according to your environment

Run script and click on Install UMLS


Define the Destination folder, select the same folder "C:\UMLS"


Click on new configuration


Click accept


Select subset


Select MySQL


Save configuration


Click Done and select begin, you will see the progress on the following window:


Install MySQL Server

Download and intall mysql server from here:
Select mysql installer

leave the password empty.  This will simplify the UMLS installation on the following steps..

Open mysql command line


Create a mysql database.  This database will be used to hold the UMLS content :

mysql -u root -p

Create user umls_user and password umls

mysql -u root -p

CREATE DATABASE umls;
CREATE USER umls_user;
SET PASSWORD FOR umls_user = PASSWORD ('umls');
GRANT SELECT ON umls.* TO umls_user;

Change settings on MySQL server on my.ini file.  Check this post which explains how to find this file in your system http://blog.sqlauthority.com/2014/01/07/mysql-locate-the-configuration-file-my-ini-or-my-cnf-on-windows-platform/ 

In my machine the file is located on "C:\ProgramData\MySQL\MySQL Server 5.6\my.ini" 

Add the following settings

key_buffer = 600M
table_cache = 300
sort_buffer_size = 500M
read_buffer_size = 200M
query_cache_limit = 3M
query_cache_size = 100M
myisam_sort_buffer_size = 200M
bulk_insert_buffer_size = 100M
join_buffer_size = 100M


If you have defined a root password in the last step, you can remove it using the following command:

open mysql command line
SET PASSWORD FOR root@localhost=PASSWORD('');

Set environment variable MYSQL_HOME 


and add it to the path 


Go to C:\UMLS\2014AB\META and edit the script populate_mysql_db.bat
You will end with something like the following: (I have removed password and the full path of mysql, since it is available thanks to the environment variable)


::
:: For useful information on loading your Metathesaurus subset
:: into a MySQL database, please consult the on-line
:: documentation at:
::
:: http://www.nlm.nih.gov/research/umls/load_scripts.html
::

::
:: Database connection parameters
:: Please edit these variables to reflect your environment
::
::set MYSQL_HOME="C:\Program Files\MySQL\MySQL Server 5.6"
set user=root
set password=
set db_name=umls

del mysql.log
echo. > mysql.log
echo ---------------------------------------- >> mysql.log 2>&1
echo Starting ...  >> mysql.log 2>&1
date /T >> mysql.log 2>&1
time /T >> mysql.log 2>&1
echo ---------------------------------------- >> mysql.log 2>&1
echo MYSQL_HOME = %MYSQL_HOME% >> mysql.log 2>&1
echo user =       %user% >> mysql.log 2>&1
echo db_name =    %db_name% >> mysql.log 2>&1
set error=0
set mrcxt_flag=0

:: Create empty mrcxt if it doesn't exist, expected by mysql_tables.sql script
if not exist MRCXT.RRF set mrcxt_flag=1
if not exist MRCXT.RRF TYPE NUL > MRCXT.RRF

echo     Create and load tables >> mysql.log 2>&1
mysql -vvv -u %user% --local-infile=1 %db_name%  < mysql_tables.sql >> mysql.log 2>&1
IF %ERRORLEVEL% NEQ 0 (set error=1
goto trailer)

echo     Create indexes >> mysql.log 2>&1
mysql -vvv -u %user% --local-infile=1 %db_name% < mysql_indexes.sql >> mysql.log 2>&1
IF %ERRORLEVEL% NEQ 0 (set error=1

IF %mrcxt_flag% EQU 1 (
del MRCXT.RRF
echo DROP TABLE IF EXISTS MRCXT; >> drop_mrcxt.sql
mysql -vvv -u %user% --local-infile=1 %db_name% < drop_mrcxt.sql >> mysql.log 2>&1
IF %ERRORLEVEL% NEQ 0 (set error=1
del drop_mrcxt.sql
)

:trailer
echo ---------------------------------------- >> mysql.log 2>&1
IF %error% NEQ 0 (
echo There were one or more errors.  Please reference the mysql.log file for details. >> mysql.log 2>&1
set retval=-1
) else (


echo Completed without errors. >> mysql.log 2>&1
set retval=0
)
echo Finished ...  >> mysql.log 2>&1
date /T >> mysql.log 2>&1
time /T >> mysql.log 2>&1
echo ---------------------------------------- >> mysql.log 2>&1
exit %retval%


Run the script, this will take some time.  After the script has finished you can verify if there were some errors during the process on mysql.log file


References
Evernote helps you remember everything and get organized effortlessly. Download Evernote.