List of steps required to install UMLS in a Windows machine:
Go to UMLS web site:
Click on Downloads
Click on the UMLS link:
Create a folder in your local machine e.g., C:\UMLS
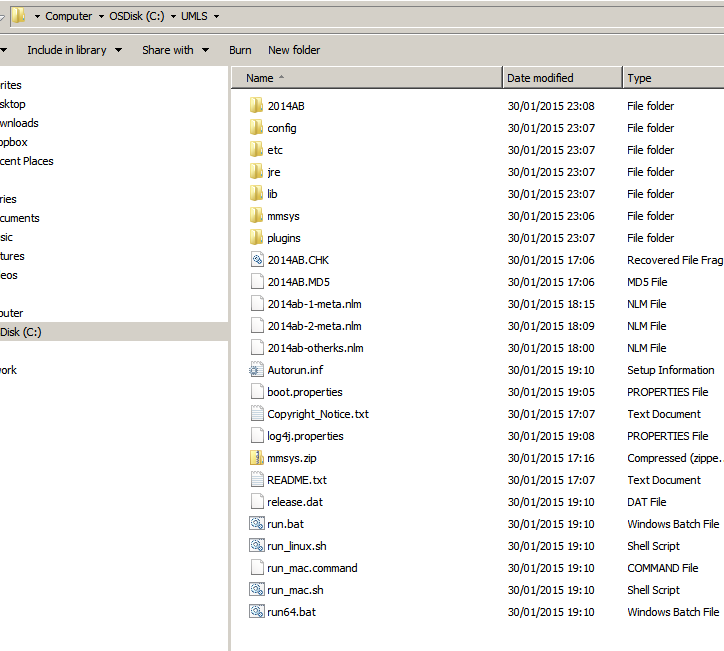
Download all files (see image below), e.g., 2014AB.CHK, 2014... You will need to register an account

After download the files your directory should look like this:
Run mmsys
run.bat or run64.bat according to your environment
Run script and click on Install UMLS

Define the Destination folder, select the same folder "C:\UMLS"

Click on new configuration

Click accept

Select subset

Select MySQL

Save configuration

Click Done and select begin, you will see the progress on the following window:


Install MySQL Server
Download and intall mysql server from here:
Select mysql installer
leave the password empty. This will simplify the UMLS installation on the following steps..
Open mysql command line

Create a mysql database. This database will be used to hold the UMLS content :
mysql -u root -p
Create user umls_user and password umls
mysql -u root -p
CREATE DATABASE umls;
CREATE USER umls_user;
SET PASSWORD FOR umls_user = PASSWORD ('umls');
GRANT SELECT ON umls.* TO umls_user;
Change settings on MySQL server on my.ini file. Check this post which explains how to find this file in your system http://blog.sqlauthority.com/2014/01/07/mysql-locate-the-configuration-file-my-ini-or-my-cnf-on-windows-platform/
In my machine the file is located on "C:\ProgramData\MySQL\MySQL Server 5.6\my.ini"
Add the following settings
key_buffer = 600M
table_cache = 300
sort_buffer_size = 500M
read_buffer_size = 200M
query_cache_limit = 3M
query_cache_size = 100M
myisam_sort_buffer_size = 200M
bulk_insert_buffer_size = 100M
join_buffer_size = 100M
If you have defined a root password in the last step, you can remove it using the following command:
open mysql command line
SET PASSWORD FOR root@localhost=PASSWORD('');
Set environment variable MYSQL_HOME

and add it to the path

Go to C:\UMLS\2014AB\META and edit the script populate_mysql_db.bat
You will end with something like the following: (I have removed password and the full path of mysql, since it is available thanks to the environment variable)
::
:: For useful information on loading your Metathesaurus subset
:: into a MySQL database, please consult the on-line
:: documentation at:
::
:: http://www.nlm.nih.gov/research/umls/load_scripts.html
::
::
:: Database connection parameters
:: Please edit these variables to reflect your environment
::
::set MYSQL_HOME="C:\Program Files\MySQL\MySQL Server 5.6"
set user=root
set password=
set db_name=umls
del mysql.log
echo. > mysql.log
echo ---------------------------------------- >> mysql.log 2>&1
echo Starting ... >> mysql.log 2>&1
date /T >> mysql.log 2>&1
time /T >> mysql.log 2>&1
echo ---------------------------------------- >> mysql.log 2>&1
echo MYSQL_HOME = %MYSQL_HOME% >> mysql.log 2>&1
echo user = %user% >> mysql.log 2>&1
echo db_name = %db_name% >> mysql.log 2>&1
set error=0
set mrcxt_flag=0
:: Create empty mrcxt if it doesn't exist, expected by mysql_tables.sql script
if not exist MRCXT.RRF set mrcxt_flag=1
if not exist MRCXT.RRF TYPE NUL > MRCXT.RRF
echo Create and load tables >> mysql.log 2>&1
mysql -vvv -u %user% --local-infile=1 %db_name% < mysql_tables.sql >> mysql.log 2>&1
IF %ERRORLEVEL% NEQ 0 (set error=1
goto trailer)
echo Create indexes >> mysql.log 2>&1
mysql -vvv -u %user% --local-infile=1 %db_name% < mysql_indexes.sql >> mysql.log 2>&1
IF %ERRORLEVEL% NEQ 0 (set error=1
IF %mrcxt_flag% EQU 1 (
del MRCXT.RRF
echo DROP TABLE IF EXISTS MRCXT; >> drop_mrcxt.sql
mysql -vvv -u %user% --local-infile=1 %db_name% < drop_mrcxt.sql >> mysql.log 2>&1
IF %ERRORLEVEL% NEQ 0 (set error=1
del drop_mrcxt.sql
)
:trailer
echo ---------------------------------------- >> mysql.log 2>&1
IF %error% NEQ 0 (
echo There were one or more errors. Please reference the mysql.log file for details. >> mysql.log 2>&1
set retval=-1
) else (
echo Completed without errors. >> mysql.log 2>&1
set retval=0
)
echo Finished ... >> mysql.log 2>&1
date /T >> mysql.log 2>&1
time /T >> mysql.log 2>&1
echo ---------------------------------------- >> mysql.log 2>&1
exit %retval%
Run the script, this will take some time. After the script has finished you can verify if there were some errors during the process on mysql.log file

References
| Evernote helps you remember everything and get organized effortlessly. Download Evernote. |


